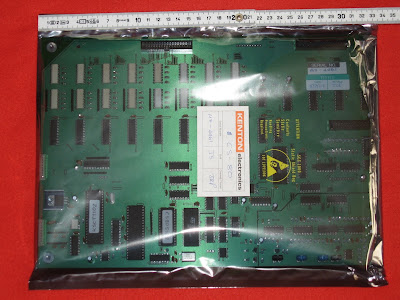
Back in 2007, shortly after I picked up my Yamaha CS-80 I was looking for MIDI options and was glad to see that Kenton still sells the Midi Retrofit Kit, which I ordered instantly. After I received the package, I was surprised about the size of the PCB, it's pretty huge (scale is metric):
 |
| CS-80 Midi Retrofit PCB |
Kit Parts
What I like about this retrofit is, it is not just a simple retrofit, it offers some useful features like controlling the cutoff, sending program changes and of course also supporting poly aftertouch. Apparently, those features also mean a lot of cables which need to be soldered at different places all over the CS-80.
 |
| Kenton CS-80 Retrofit Kit Parts |
The Installation
Unfortunately I have not taken many pictures back then, nor can I remember many details about the installation, so I'm unable to get into deep details about the process.
My friend
MiK did the installation back in 2007 and I cannot remember any tantrums, so I think it went pretty straight forward. The only thing we did different from the instruction was not to drill any holes into the CS-80 (Kenton, instructing to drill holes into a CS-80, seriously? ;-) ).
Midi Jacks
As I didn't want any holes drilled into the case for the MIDI jacks, some kind of a breakout cable has been installed which leaves the case untouched. The power cord tray turned out to be the perfect place.
 |
| Power cord tray |
 |
| Midi Jack Breakout cable |
Push Button / Switch
In addition with the Retrofit comes a little plate with a switch and a push button. The installation manual instructs to drill two holes in the front left-hand corner for installing the plate. Again, as drilling holes into the front case was out of question a better place had to be found. We aimed for the headphone jack. The plate provides enough space and drilling holes into the phone plate won't "uglify" the CS-80.
 |
| Choosing a destination |
 |
| Switch and button installed on the headphone plate |
 |
| Final result |
 |
| Push button and switch sticking out of the case bottom |
It works pretty well. However, the switch and the button will stick out a little. As I don't luggage the CS-80 around (except for the one time when I moved places), and as the case has a slope going up at front it is kind of safe there (if I don't do anything stupid by accident).
A few assorted Pictures
 |
MiK during Installation
Don't ask about the beer bottle, it is part of a running gag.
Some may call it a risky one. ;-) |
 |
| Kenton Midi Interface with ribbon cables going into every direction |
 |
| Patch selector ribbon cable |
 |
| Just Another Interface Picture |
 |
| KAS Board |


